Showing posts with label projects. Show all posts

Thursday, September 22, 2011

Little Changes

I made a little update to our master bedroom over the weekend.  I needed a new coverlet/duvet/comforter for the bed because our beloved puppy had chewed a few holes in the old one, ugh.  We had been getting by with another (pale aqua) coverlet for the summer that I already had in storage.  It served it's purpose but it was a bit bright for the muted tones of the rest of the room.  This past weekend I found the perfect replacement (at least for the winter.)  I've been waiting for a bright and sunny day to photograph it in my generally already dark house but it has been grey and gloomy all week.  I gave up on the sun and decided to snap a quick peak anyway and this is what I found.

DSC_0002

The Sweet Puppy can't manage to get herself out of the bed before noon (or sometimes 1:00, or 2:00!)  If you can look past the puppy you will see a great replacement for our bedcovering. 

DSC_0009

It's from the Thomas O'Brien Modern Charcoal collection at Target.  It has a beautiful woven texture that adds a great subtle layer of detail to the bedroom.  It has a manly quality to it that I love too.  I like a mix of girly and masculine in my rooms and this looks and feels a bit like a well worn suit.  It's also super soft and warm to sleep under (I LOVE heavy blankets and a cool room).  It was a great deal (meaning that it was clearanced) and will get us through the upcoming cooler weather very nicely.  It will be too warm when spring roles around again so it will be back to the drawing board for me. 

Until then, I look forward to snuggling under the covers just like this.

DSC_0013


Neither Target nor Thomas O'Brien asked for this endorsement.  I bought it, I liked it and I thought I'd share it.

Tuesday, September 20, 2011

Found It!

As I mentioned here, I had been fabric shopping for new drapes for the guest room when it occurred to me that I might already own the perfect thing (well, at least perfect enough as they would be free!)  If I still had my drapes from college they could only be in a few places after all these years.  I dug all around the attic and they were nowhere to be found.  I called my Mama to see if they had been left with her.  She didn't have them but she did remember that my Sister had used them in her first apartment many years ago before she got married.  Sister actually laid her hands on them, 4 moves and 3 children later.  Bless her!!

 
They still need a bit of work.  They need to be lined and I need to re-do the top (remember when tab top curtains were da bomb?)  Overall though this gives me a starting point that I've desperately been needing and the price can't be beat!  What do you think?  Can I make it work?

Wednesday, June 8, 2011

Nobody Likes a White Ring

We have this little drop leaf table that belonged to the Husband's grandparents.  The finish is a bit worn and the veneer is chipped in a few places but it still functions. We had been using it as a bedside table in our former guest room and are planning to use it as a temporary desk in the new office during the Big Move.  There was a little something extra about the table that I couldn't ignore any longer.


If you look past my super-bad photography, you can see the big water stain on one end.  I'm so embarrassed that I've had guests that have used the table in this shape (Sorry Mom and Dad!)  I don't even know how it got there or how long ago it happened.  Here's a closer view.


Definitely not pretty.  Then I remembered reading about a quick and easy solution to the problem involving an iron (as in, I hate to do laundry and I never iron).  After a little googling around for confirmation I decided to give it a try. 


Using a dry pillowcase and the iron set to a medium-low temp and no steam, I ironed over the affected area for 10 seconds or so at a time, lifting the pillowcase to check the spot until it completely disappeared.  It was pretty amazing.


The finish on the table is still worn but the spot is gone!!  I can't believe I waited this long to take care of it.  Now, does anyone have any tips for making the finish look better?  We are planning to use it as a defacto partners desk until we find a better/bigger solution.


I've already moved into my half the desk.  The work has only begun though.  Workbench has already been disassembled and painting will (hopefully) happen this weekend.  Progress is slow but steady.  It's going to be great when we get everything done.  Now I can check de-waterspotting the table off my to-do list. 

Wednesday, June 1, 2011

We're Moving!

 Atlanta Homes and Lifestyles via Blueprint Bliss

Well, sort of....Several weeks ago the Husband and I were talking about the house which led to a conversation about our dream house.   But talking about the future "perfect" house let us talk about ways we could achieve some of those goals with the home that we already have. Though it's not perfect, the house we have now is ours and I don't think we'll be going anywhere any time soon.  After a lot of thought I came up with a plan to rearrange half the rooms in the house (I even drew up plans because I'm that kind of dork!) and spent the next couple of weeks trying not to overwhelm my Sweet Husband with all the work that lay before us. 

Check out this graphic I made to help demonstrate the plan:


We are moving the music room downstairs so that the Husband doesn't have to lug his bass up and down the stairs on an almost daily basis when he has a gig.  The rarely used guest room is moving into our tiny shared office because something that is only used 2 or 3 times a year should not be taking up that much real estate.  And finally, the office is moving upstairs into the old music room spot for more space and happily more sunlight (yay!) 
The other brilliant part of this plan is that these rooms hadn't really ever been finished, meaning that we hadn't already spent a lot of time and money to make them functional as well as fashionable.  As I have mentioned on many occasions here on the blog, I wanted to install shelving in the office and have somehow managed to do that for more than a year now.  I had even taken the step of buying shelf brackets last month but I just couldn't seem to finish the job.  Now I know that I was just waiting for the perfect plan to come along! 
We'll be living in a bit of chaos for awhile but I'm really excited about how everything is working out. 

Friday, December 10, 2010

Starting Over Before Your Begin

 via Cottage Living

I've been thinking a lot about starting over recently.  A client came to me last week just as we were putting the finishing touches on the design plan and getting ready to move into the construction phase for their new sunroom/screened porch/deck to say that after "living" with the plan for a while they have now decided that they want to start over and go in a different direction with their project.  This is not what we wanted to hear obviously, but it was the best thing the client could say.  Construction hadn't started.  We weren't ripping down walls and building them back again, yet!  It is much easier for me to move walls on paper than it is to re-design a project in the middle of construction or for the client to realize AFTER the project is complete that it isn't what they really wanted. 

via Coastal Living

The client did a brave thing coming forward.  They admitted that their inital requests for the project, after some reflection, weren't what they really wanted.  By choosing to mentally live in the new space over several weeks they came to realize that the existing room we were working with wasn't big enough for how they planned to use it; that they would rather increase the size of the existing room and move the new screened porch to a different location.   Had they not thought about it in those terms they would have had a finished space that wasn't big enough to use they way they want.  All of that time and money would have been spent and they wouldn't have gotten what they wanted. 

 via Cottage Living

The trap to avoid in situations like this is to not just be second-guessing yourself though.  If you want to make a big change to your home at some point you have to say yes and make the change.  It's good to re-evaluate your choices but at some point you need to make a decision and actually do the work. 

In your own life and home do you feel like you are good at making decisions or do you always second guess yourself and hold up progress by your unsure feelings?   

Sorry no great project photos, but obviously we haven't built anything yet!

Tuesday, November 23, 2010

Fast Changes for Thanksgiving

My sweet, talented, hardworking, amazing Sister wanted to update her dining room.  We are having a family meal at her house in Charlottesville on Saturday so she's been inspired to work fast and bust out a few projects before the big day.  (I am NEVER that fast with anything and am always in awe of her!!)  Her family moved into this house three years ago and this was one of the first rooms to get a mini-makeover (paint, new drapes, etc).  But after living in the house for awhile my Sister has a better understanding of how she wants the whole house to feel and is going back to make some changes.

First on the list is to change out the dining room ceiling fan for something more fab.


This is an obvious choice because who wants a ceiling fan over their dining table (except maybe my husband!)  Sister also had a swatch of fabric that she LOVED but couldn't bring herself to pay that much for all the yardage needed for new curtains.  Then she decided to cover a drum shade in the new fabric to make the new light fixture and TA-DA!


Love the new shade.  Can't wait to see it and all my family on Saturday.  Happy Thanksgiving!!

Thursday, October 28, 2010

What Have I Made Lately

Pardon me as I take a design break, sort of...

As I've mentioned before I've been a little crazy with the knitting lately.  I like small projects for the instant gratification and in general I'm a pretty impatient knitter.  The goal I've set for myself is to make a sweater.  I'm a little intimidated but excited about the prospect.  I'm sure I'll have to do something else while I'm working on it too to keep me from completely burning out.  In the meantime, here's what I've made lately:

the Republic Hat - took me forever to find buttons for this bad boy.  Does anyone have a good button source?

 All Away Around Cowl - This was my first attempt at making something seamless with a provisional cast on and using a kitchner stitch to finish.  It's not perfect but it worked out okay in the end.

French Press Slippers - one of my most favorite things I've ever made.  These are SO cute and really easy!  They ended up a little big so my Mom got to be the proud owner of the first pair.  I can't wait to make more.

The Clutch You'll Never Want To Give Up - this clutch is mostly done.  I still need to sew on some buttons or make a fabric flower to glam it up a bit.  My Sister has promised to help me make a lining for it too.

Rosie's new Chihuahua Sweater - my first dog sweater knitted in the round.  I modified the pattern a bit to give some shaping to Rosie's slim figure.  And I made sleeves for the first time!  She looks super cute wearing it when the weather's chilly (the girl shivers at anything below 80 degrees)


Cabled Cowl - this cowl turned out nice and I really love the color of the merino/cashmere blend yarn (it's called limoncello)

and last but not least
Fetching - fingerless gloves to keep my too cold hands warm in the house this winter (the Husband thinks I have ice blocks attached to my hands and feet)

Okay, thanks for the diversion.  Back to design tomorrow!

Tuesday, October 26, 2010

In Process: A Tiny Master Bath Gets An Upgrade

I thought I'd start showing some of the stuff that I work on, showing the process of how it all comes together.  A little bit of process before the big reveal if you will. 


A few weeks ago I went tile shopping with clients to pull together the palette for their tiny bath and I snapped some pics along the way. 


Here's the countertop too.  (we didn't have a sample with us that day which I don't normally recommend by the way!)

After shopping I sketched up some tile patterns for the master has well as the hall bath for the clients to choose what they liked best.


There are still lots of decisions to be made (plumbing fixtures, paint color, mirrors, accessories, lighting, etc)  but we've made a great start and I can't wait to see it once it's complete.  Now we just have to wait for the demolition (and the installation!) to begin.

Monday, October 11, 2010

Can This Be Made Fabulous? - the foot

Do you remember this dresser:


Well, as with most things around here it has taken longer than I originally thought to get it painted.  The work has finally been done but before I make the big reveal I thought I'd show you a funny little detail that emerged after the first few coats of paint.


It has TWO toes with nails on each foot that looks a bit crude and creepy all at the same time.  There's an almost human quality to it in person.  It makes me laugh every time I see them.  It definitely adds an unexpected layer of character to the piece.  Probably not something I would have chosen but now that I have it I love it.  So what do you think?  Fun?  Creepy?  Disturbing?  I give it two toes up.

Wednesday, September 22, 2010

Pardon Me While I Ramble....

I have been feeling a bit anti-design blog lately and needed to step away from the keyboard a bit.  Design is my job but it's also my hobby and it can be all consuming sometimes.  I have a great passion for it but sometimes it just feels like work and I need a bit of a break to regroup and to think about other things....though, to be honest, it's hard for me to stop thinking about the new sofa I want or the new kitchen I want or the new bed for the guest room I want, etc. etc.  It's not even about wanting stuff.  It's about dreaming of creating a home and spaces that I truly love.  I guess on top of it all I'm feeling a bit like the Cobbler whose children need new shoes. 

Aggh, to get back on track with the topic at hand,  I am trying to give my brain (and heart) a break by doing other things.  I taught myself to knit several years ago and for a very long time made lots of scarves.  It was something simple that I didn't have to think too much about and didn't have to even follow any directions.   Finally last year I decided to take it up a notch and learn some new skills.  I learned to knit in the round and made several hats.  Then I learned to cable and made this hat:


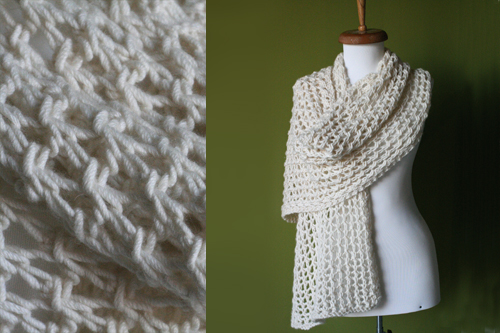
Who knew cabling was so easy.  It looks so complicated.  That taught me the valuable lesson that you won't be able to do it unless you try.  I tend to put the needles down in warm weather so I hadn't made anything lately until a few weeks ago.  I needed a distraction and I was inspired to make this wrap which actually turned out pretty nice (I still need to block it though)


 After finishing this I decided that I have the attention span of a gnat and needed something small to work on.  I've had varying degrees of sucess but I really like how these organic cotton dishcloths turned out. 


I found this excellent pattern from the Homespun Living blog.  The cotton is so soft and beautiful.  I doubt that it will make me want to wash the dishes any better though!    Now I'm making myself a pair of these. 


Ah, for cooler weather and a calmer mind. 


Monday, August 30, 2010

The Lost Weekend

Pardon me while I leave the design observations to talk about yarn for awhile....

So I got this incredible urge to knit again last week.  It's a hobby that I enjoy during the cooler months but usually during hot weather I put the needles down.  I started by working on a scarf that I started sometime last year and abandoned for more interesting projects.  I thought it would be nice to start slow, to see if I even remembered how to knit and purl.  By Friday night I had a full on fever for new projects.  I spent the evening searching for new patterns/ projects and couldn't stop thinking about it when I went to bed.  Saturday morning I went out and bought the supplies to make this:


Okay, so I don't have the budget or skill for cashmere, but I thought I'd give it a try with some nice wool and maybe work my skills up to the level of cashmere for next time.  When I got home I decided that I should finish that old scarf before I started something else, but along the way I stumbled across this little cowl:


I immediately dropped everything and spent the rest of my Saturday night making it.  (I know, I lead such an exciting life!)  By Sunday morning I had finished:


I will definitely use bigger needles than the pattern called for next time.  Over all I"m happy with the project and look forward to trying it again.  The rest of the weekend was spent in a knitting haze.  Now clear eyed on Monday I wish I could have my weekend back but am excited for projects to come. 

A clear headed design mind will be back tomorrow.  Happy Monday! 

Monday, August 9, 2010

My Little Pelmet Project

On Friday night I FINALLY finished the DIY pelmet project that I had bought fabric for months ago.  It was super easy and I'm still not sure why I waited so long to take care of it.  I can't thank Jenny from Little Green Notebook enough for this easy tutorial that made the project a snap.   I started with a couple of pieces of foam core:

 
Then taped the pieces together with duct tape:


the Puppy clearly became bored with the whole affair and found something better to do:


Wrapped it with fabric and batting and stapled everything down smoothly then added nail head trim:


And here it is finally installed in the dormer window in the Master bedroom.  Now I just need to paint the bookcase below and try to take a better picture so that you can see the whole effect.

 
Thanks again to Jenny's tutorial from last September for making this so easy. 

Wednesday, July 28, 2010

Not My Mother's Jewelry Box

When I was a little girl I used to love to play in my Mom's jewelry box.  It sat in our bathroom on a counter behind the door and I would more than occasionally take the opportunity to take a peek inside.  A lot of my Mom's necklaces stayed all balled up together in the bottom of the box and was a bit of a tangled mess (not helped by my rummaging around in there!)  When I grew up and had a place of my own I got into the habit of hammering a row of tiny nails inside my closet to hang my necklaces on.  This actually works great but in this house I thought I'd take it to the next level.  Enter a four pack of cork tiles, a cheap mirror the Husband owned pre-marriage, a straight edge and a roll of double sided tape!


(Yes, that is my unmade bed, don't judge!)  When we got married and I officially moved into the Reslus Arms, we moved the master bedroom upstairs.  The new room in our sweet little cape cod has a lot of light for this dark house and a walk in closet.  The closet is long and narrow with a nice big wall that wanted to be something.


 Now we have a mirror and the cork tile jewelry hanger system to make it all more functional.  First we measured and marked the location of each tile (actually I eye balled it, but if you need it to be perfect within a 1/16" then you should measure and lightly mark with a pencil- you can erase the lines when you're done)  Then peel the cover off the adhesive tabs on each corner of the tile and apply it to the wall, gently pressing each corner to make sure you have good contact.  You don't want things falling in the middle of the night!  Next we applied long strips of heavy duty double sided tape to the back to the long, narrow mirror.  I like to apply the tape near the edge of all four sides to get good contact with the wall.  Again measure and mark your mirror location.  Use a small level to make sure you have everything where it needs to be.  Once we felt good with our location we pealed the cover off the tape and applied the mirror to the wall (just like the cork) pressing firmly around all the edges once we got everything lined up straight and level.  Super easy! 


  I'm also using clear tacks to hang my jewelry.  By using the tacks on the cork everything is much more configurable.

 
My next task is to add a few more cork squares, some artwork and change out the utilitarian light fixture for something a little more fun.  Thanks for joining me on my work in progress!  How do you store your jewelry? 

Monday, July 12, 2010

Can This Be Made Fabulous?


I finally found (actually the Husband spotted it first!) the perfect bedside table for the Husband.  It needs a little TLC but should be fantastic when we're finished with it.  Of course that means actually getting to work on it!  I'm a horrible procrastinator and am hoping that by posting this I will be "encouraged" to get it done faster!!  I have a selection of Krylon paints on the ready:


though I can't seem to decide which to use.  The Husband likes the green (Celery) but I think it might be too minty when it's all done.  The Almond is nice...and safe.  It's probably what I would feel most comfortable using.  Finally there is the Bahama Sea which is a great fresh blue that would be a great punch of color in the otherwise subdued palette of our bedroom.  Decisions, decisions....


I also stopped by Anthropologie to check out the Rhino (sad to report a misguided crafts project for my purposes) and find some fab hardware.  I came home with these options.  So far my Sweet Husband is not a fan on any of these choices.  Oh well, back to the drawing board!

Hopefully I'll have an update soon!

Tuesday, June 8, 2010

Rug Love

I'm in a mad search for a very inexpensive rug for a project I'm working on (a little boy's room, so cute!)  I've fallen in love with these ikea rugs but believe it or not they are still out of budget!  Sooo perfect though!


Ah, well.  On with the search!
Related Posts Plugin for WordPress, Blogger...